


This tutorial originally appeared in the
Pottery Making Illustrated
May-June 2003 issue (Vol. 6 Issue 3, p.23) as an article entitled "How to Make a Rattle Mug".
Use the pause control above and the internal slider bar below as needed.
Click here to view the article text only.
My interest in rattle mugs started in 1989 on an innocent trip with my husband to the four corners area to enjoy the vistas, geology, history and pottery of the area. While visiting one museum I inquired about the interesting southwest Indian artifacts labeled "rattle mugs". What are the rattles and what were the purpose of these mugs? This article will explain how a mug can rattle.
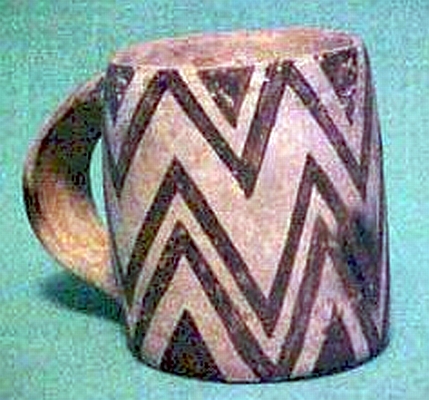
The usual answer to 'purpose?' for rattle mugs was that they are ceremonial. Searching for more information, we found the book Anasazi Pottery, which discussed rattle mugs. They are associated with the Mesa Verde Pueblo III period, of 1100-1300 AD (two mugs pictured above are dated to the Puebloan II-III period, ca A.D. 900-1350). They were often found with the dead as was other mortuary offerings in the San Juan area. Sizes of the mugs varied from 4 7/8" to 2". On the same trip while visiting a very small city museum, we had the opportunity to hold and examine several of these rattle mugs. Wow, the energy and history they radiate! As a result of our investigation, we decided that the mugs had to have been used in happier times as well as funereal.
Sharing our trip experience with one of my pottery classes, I was discussing the rattle mugs and how clever they were. They asked if I could demonstrate how to make it. I agreed to do so but I choose not to copy the Anasazi shapes or designs; I applied the concept only to my stoneware mug.
The following process describes how to add a rattle to your mug (step numbers below correspond to picture caption numbers above):
- Step 1.
- I start by throwing my basic mug with maybe a little wider base. I use 12oz of clay. Let this dry to medium leather hard. The rim needs to be strong and dry enough to support the mug and the base needs to be moist enough to accept a coil of clay.
NOTE: In deciding to make a rattle mug be sure to consider the additional height gained because of the false bottom. - Step 2.
- With about 6-8 oz. of clay roll a coil a little longer than needed to go around the base of the mug. Set the coil aside.
- Step 3.
- Once the mug is sufficiently dry, center and secure it upside down on a bat.
TIP: Center and secure the mug on a bat prior to attaching and throwing the coil bottom (Steps 6 - 12). Having the mug on the bat will eliminate the need to re-center the mug if the closed form needs to be re-ribbed. - Step 4.
- Score the top outer edge of the mug base preparatory to attaching the coil.
- Step 5.
- Apply slip if desired before adding the coil.
- Step 6.
- Start with one end of the coil. Place it on the base of the mug where scoring and slip have been applied but don't attach it yet.
- Step 7.
- Place the other end of the coil on top of the first end.
- Step 8.
- With a cutting tool, cut through the overlapped coil ends. Be careful to not cut the mug base. Remove cut scraps.
- Step 9.
- Align the coil ends and compress them gently together.
- Step 10.
- Carefully attach the coil to the base by pressing down and smoothing the coil on the outside and the inside. The smoother the coil attachment, the easier it shall be to center and throw the piece.
- Step 11.
- Using as little water and pressure as possible (or you will collapse the mug) begin to center and throw the coil on the mug's base into a cylinder.
- Step 12.
- Pull the coil to a cylinder tall enough to make a closed form that will hold the rattles. Don't close the form completely yet.
- Step 13.
- Next, roll 5 or 6 various size balls of clay (pea sized) that will fit in the closed form but still have room to rattle.
- Step 14.
- Wrap each ball in small pieces of paper. This is to keep them from sticking to one another or to the base of the mug.
TIP: I also keep previously prepared clay balls stored dry in alumina hydrate so they are ready for use. The al-hydrate keeps the clay from fusing together. I still wrap these in paper before use. - Step 15.
- Drop the wrapped clay ball into the almost-closed base cylinder.
- Step 16.
- Throw the cylinder to close it.
- Step 17.
- Compress with a rib to flatten the mug base bottom and sides. The base may be a little rounded. Because it will be full of air, it may not cooperate fully.
- Step 18.
- If that is the case, use a needle tool to pierce the base to release air pressure.
- Step 19.
- Let it dry a bit, and carefully continue to shape with the rib again. If it is still a little rounded call it finished, set it aside to dry and come back later to compress the bottom flat or even concave so it doesn't wobble.
- Step 20.
- Pull and attach a handle once the mug is firm enough.
- Step 21.
- Optionally decorative holes or other designs may be cut into the base when the mug is leatherhard. These decorations should not be large enough for the clay balls to fall out.
After the mug is bone dry I use terra sigillata on the false base. I choose not to glaze this portion of my mugs. The terra sigillata gives the surface a softer look and sets it off from the glazed mug body. The use of terra sigillata application is optional but one should be very careful when glazing not to let glaze enter any hole, decoration or puncture vent, which would cause the clay balls to fuse inside the rattle mug base.
When the rattle mug is dry, it is bisque fired to cone 06 and glaze fired to cone 5 or 6 in an electric kiln. Note that wood firing or salt glazing might also cause the rattles to fuse.
After a few years of displaying rattle mugs with regular mugs at art shows, it became frustrating that patrons didn't discover the rattle feature without literature, discussion or a shake of the mug. That's when I gave them a visual hint by adding decorative holes in the sides of the false bottom. Now, "How could this mug hold liquid if it has holes in it?" often began the discussion and smiles would appear on faces when the mug started to rattle. Then I would share the rattle mug origin and construction details.
References:
- "Anasazi Pottery" Robert H. Lister & Florence C. Lister, pp 60-61; Maxwell Museum of Anthropology and University of New Mexico Press © 1989; ISBN 0-8263-0473-7; LC CCN 78-6825.
- Masters Thesis "An Archaeological Survey of Montezuma Village", by Ray T. Matheny; 1962 (an Anasazi ruin located in the canyons of the San Juan River, near Monticello, Utah.)